Are 5 Gallon Buckets Safe for Growing Vegetables? Check the Label
The short answer is on the label
A 5-gallon bucket can be a reasonable vegetable container, but I’d buy it for edible crops only when its label or manufacturer explicitly supports food contact or food use and you know what it previously held. The nominal size is about 18.9 litres (5 US gallons, or roughly 4.16 imperial gallons), but the recycling number on the base is not the safety answer.
That is a conservative buying test, not a claim that one phrase makes a bucket suitable for every food, temperature or growing condition. “Food contact,” “food use,” “food grade,” and “potable-water storage” give you a traceable intended use. A product number lets you ask the manufacturer what the statement covers. If nobody can identify the bucket or its history, there’s no useful safety trail to follow.
An unmarked horticultural pot is a different problem from a mystery chemical bucket. The horticultural pot may have been made for soil and may be perfectly practical for vegetables, but it still lacks the label evidence I’d want before using it for edible plants. A bucket that once held an unknown liquid has the added problem of previous contents.
At the shelf, turn the bucket over before buying it. The small molded line on the base or the product number beside the barcode can tell you more than a large front sticker saying “BPA-free.”
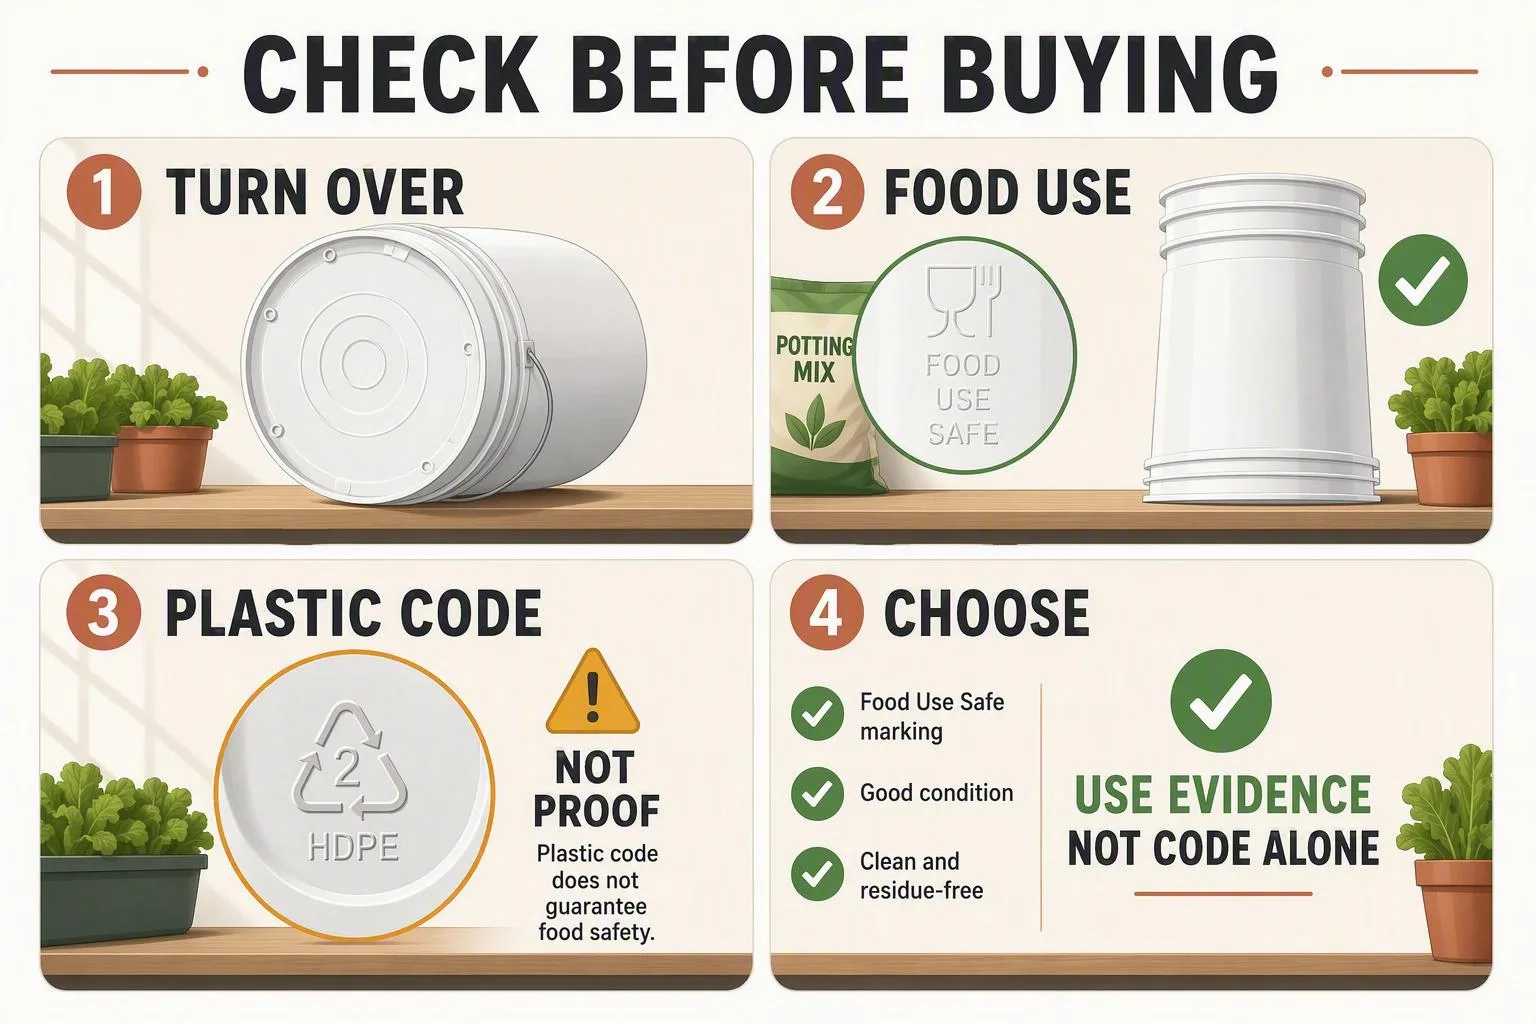
Decode the marks on the side and base
Read the label as a hierarchy of evidence rather than a collection of reassuring words. I’d put intended use first, traceability second, and general plastic markings third.
- Strongest buying clue: wording such as “food contact,” “for food use,” or “food grade,” paired with a manufacturer or product number you can trace. A clear statement that the container is intended for potable-water storage is also more useful than colour or a recycling symbol, though you should still check the stated conditions.
- Useful traceability: a manufacturer name, model or product number, instructions, and a compliance statement. The statement may appear on packaging rather than on the bucket itself.
- Weak clues: “BPA-free,” a recycling triangle, the colour of the plastic, or the fact that a bucket is sold in a garden centre. Each describes only one part of the product, if that.
- Stop signs: “not for food use,” “non-food,” a chemical warning, a missing product identity, or a previous-use story that cannot be checked.
The triangle marked 2, commonly used to identify a bucket’s main resin family as HDPE, is useful material information. It does not, by itself, tell you which additives, pigments, processing aids, surface treatments, or manufacturing conditions are involved. It also says nothing about what the bucket held before you bought it.
That distinction matters because a plastic family is not the same thing as a finished product approval. Two buckets can use the same broad resin family while being made for different jobs. One may be sold for food ingredients; another may be made for paint, adhesive, cleaning chemicals, or general hardware storage.
“BPA-free” is narrower still. It addresses one chemical that may be absent from the formulation; it does not establish the complete formulation, intended use, temperature range, or previous contents. I would treat it as a useful detail only after the food-use question has been answered.
Food-contact compliance can also be conditional. A manufacturer may specify a type of food, a temperature range, a storage purpose, or a single-use/reuse condition. The wording and legal framework vary by country, so check your national food-contact regulator's guidance when the label uses a compliance claim you don’t understand. If the manufacturer’s product page and the physical label disagree, pause the purchase and ask for the product number to be confirmed.
For the resin symbol itself, compare the explanation with resin identification code guidance from a standards body, but don’t mistake that explanation for a food-use certificate. The code helps identify the material category; the use statement answers the question you actually care about.
A used bucket inherits its previous contents
The bucket’s history deserves its own test. A new, traceable food-use bucket is the simplest choice. A used bucket can be reasonable only when both its previous contents and its intended material use are known.
- New and explicitly intended for food: This is the cleanest starting point. Inspect it for damage, then prepare it for planting.
- Known to have held flour, sugar, grains, or another food ingredient: This is a much better candidate than an unknown bucket, provided the product was intended for food contact and the inside is intact. Remove any caked material before planting.
- Known to have held clean water: This gives you a clear history, but I’d still look for a potable-water or food-contact statement rather than relying on the word “water” alone. A container for dirty utility water is not automatically a food-use container.
- Unknown, chemically used, or labelled non-food: Reject it for edible plants. That includes buckets used for pesticides, herbicides, fungicides, solvents, fuel, oil, paint, wood treatment, or industrial chemicals.
Scrubbing, diluted bleach, sunlight, and the absence of an odour can improve cleanliness; they cannot give you a reliable history or prove that a previous chemical has been cleared. Residue may be associated with scratches, seams, lid grooves, or a film that is not obvious by sight. The practical issue is not whether the bucket looks clean. It is that you cannot verify what the material has already contacted or how it was formulated for that job.
A chemical-container disposal instruction is not permission to turn the container into a vegetable planter. Disposal guidance tells you how to handle an unwanted container safely; it does not certify the container for growing food. Follow the relevant local disposal route instead of washing a chemical bucket into a drain or garden.
A rejected bucket still has uses. Reserve it for ornamental plants, potting tools, non-food storage, or a recycling/disposal route appropriate to its former contents. Keep the edible crop out of it.
Colour and wear affect heat and durability—not food-contact status
Black plastic is not automatically unsafe, and white plastic is not automatically food-safe. Colour may change how much solar energy the container absorbs, but it does not reveal the full formulation or the bucket’s history.
In strong sun, a dark bucket can warm the root zone more than a lighter one. A small container has little thermal and moisture buffer, so the mix can heat and dry faster beside a sunlit wall, glass railing, or pale paving. That is a growing-condition problem, not proof that the plastic is unsuitable for food. Move the bucket, shade the outer wall without blocking drainage, or choose a lighter-coloured container if the position cannot change.
Condition is a separate inspection. Put back any bucket that is UV-faded and brittle, cracked, badly warped, deeply scratched, or chemically stained. A crack can widen when the wet mix presses against it, and a brittle rim may fail when you lift the planted bucket. Damage also makes drainage and handling less predictable.
A chemical smell is enough reason to reject a bucket. No smell is not evidence that the bucket is food-contact suitable; many unsuitable products have no obvious odour. Don’t paint the inside as a shortcut. The coating becomes another material in contact with wet mix, roots, and drainage water, with its own food-contact questions.
An ordinary bin liner is not a dependable safety barrier either. It has its own formulation, can puncture against drilled holes, can trap water if installed badly, and may prevent the bucket from draining as designed. If you need a liner for a particular container, use one specifically identified for prolonged contact with wet growing media and keep its drainage instructions intact. A liner should not rescue a bucket with unknown chemical history.
Build the planter in this order
Once the bucket passes the label-and-history test, prepare it before buying seedlings. The order matters: drilling and washing a rejected bucket wastes time, while adding mix before checking the holes makes it harder to inspect the base.
- Verify the use and history. Photograph the side and base label. Record the product number if there is one. If the wording is unclear, stop here and ask the manufacturer.
- Inspect the plastic. Look inside and outside for cracks, sticky films, staining, severe scratches, brittle patches, or a chemical smell. Check that the rim can support the filled container during a move.
- Drill the drainage. For a typical bucket, a workable starting pattern is roughly 8–12 holes, each about 6–10 mm (1/4–3/8 inch) across, spread across the base rather than clustered in one spot. This is a starting layout, not a universal container standard. Fine, water-retentive mix and very wet conditions call for more attention to drainage; a coarse mix in a sheltered position may drain readily with fewer openings.
- Remove burrs and wash. Sand or trim sharp plastic around the holes so it does not catch roots, gloves, or fabric. Wash with mild, unscented dish detergent, then rinse thoroughly. Washing comes after drilling because plastic dust and burrs need to leave with the rinse water.
- Add container mix, not garden soil. Fill to about 3–5 cm (1–2 inches) below the rim, or roughly two fingers of headspace. In a nominal 18.9-litre bucket, that commonly leaves about 15–18 litres (4.0–4.8 US gallons; 3.3–4.0 imperial gallons) of usable mix, depending on the bucket’s shape and how much headspace you leave.
A perched water table is a wet layer that remains at the bottom of a container above the drainage openings. Water does not behave like a marble rolling through an empty tube: small pores in the mix hold water by capillary forces, and the change from mix to open air at the hole can leave a saturated zone behind. That wet zone is why roots near the base can suffer even though water is visibly coming out of the holes.
Gravel in the base does not reliably remove that wet zone. It takes up root space and creates a sharp change between fine potting mix and coarse stone, which can leave the saturated mix sitting higher rather than lower. Put the drainage openings at the bottom, keep them clear, and let the container mix provide the root volume.
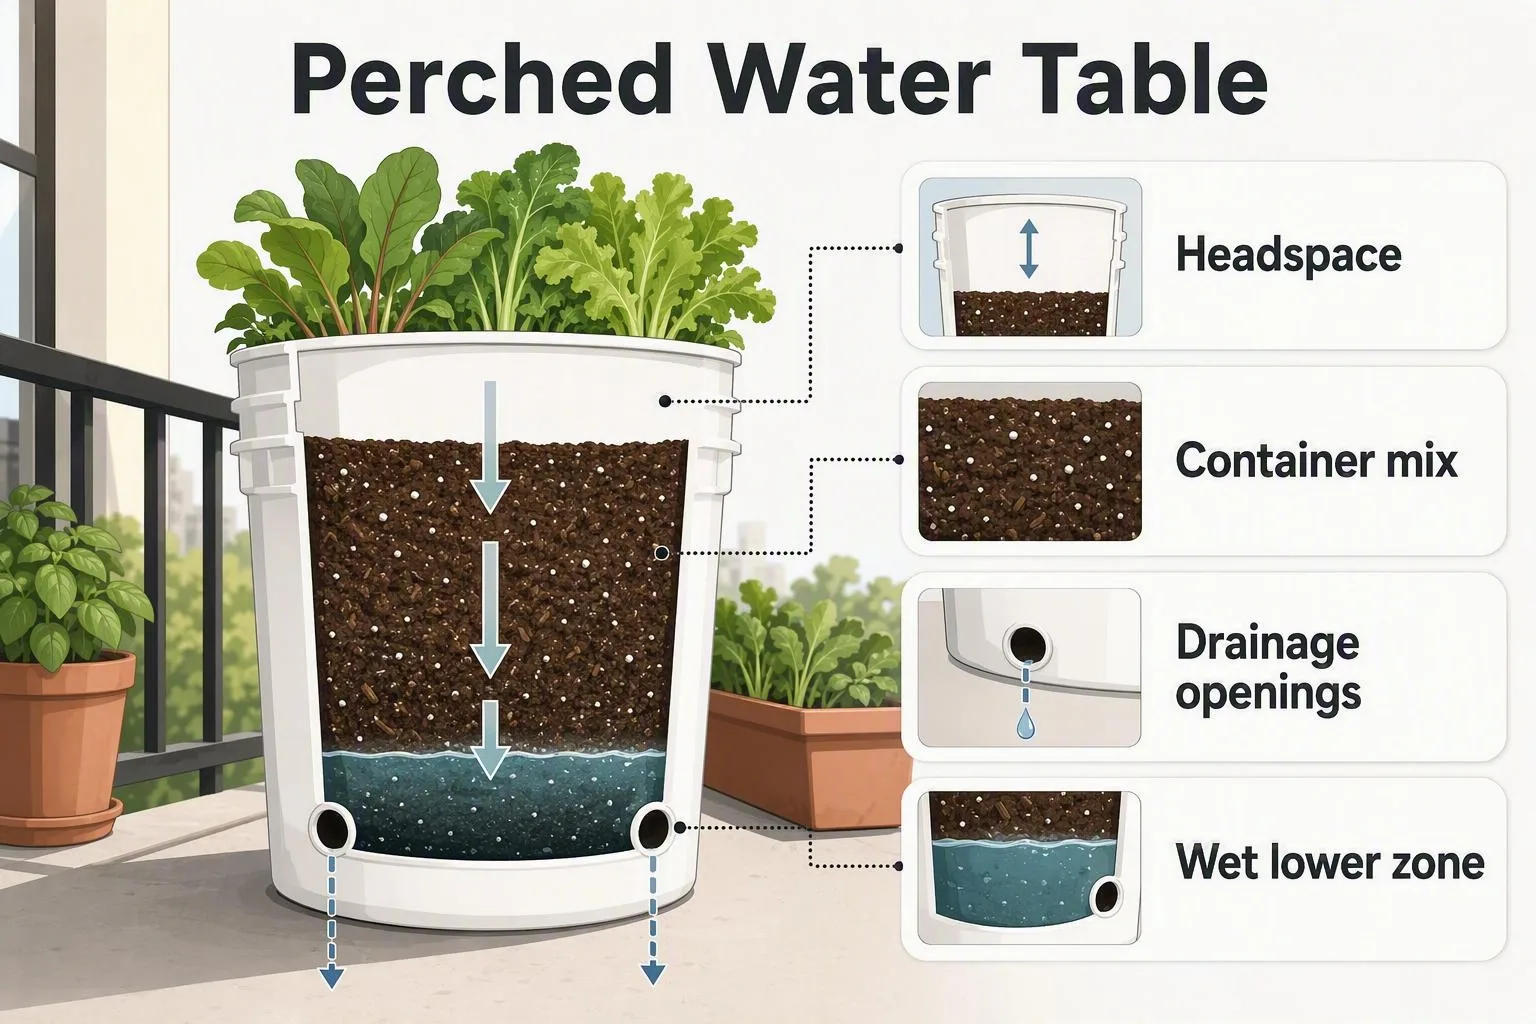
For a closer volume calculation, use How much potting mix does a 5-gallon bucket hold? Litres and cubic feet. For hole layout, compare the starting pattern with How many drainage holes does a container need? The bucket should sit on feet, a slatted stand, or another support that leaves the openings open. If it sits in a saucer, empty standing water after it has drained rather than leaving the base submerged.
Finally, plan the position before the plant gets large. A wet bucket, its mix, the plant, and a support can create a substantial balcony load. Keep it on a stable surface, avoid a top-heavy arrangement near the edge, and check the building, landlord, or strata rules if you are unsure about the permitted load. Wind stability is part of container design, not an afterthought.
Use the 19-litre volume for the right crops
A 5-gallon bucket is large enough for several useful crops, but its nominal capacity does not guarantee a good harvest. The figures below are planning starting points for usable mix after headspace, not universal root requirements. Mature plant size, variety, climate, support, and how often you can water will change the result.
| Crop | Plants per bucket | Approximate usable mix | Main constraint |
|---|---|---|---|
| Compact or determinate tomato | 1 | 15–18 L (4.0–4.8 US gal; 3.3–4.0 imp gal) | Support, sun, and steady moisture |
| Pepper or chilli | 1 | 10–15 L (2.6–4.0 US gal; 2.2–3.3 imp gal) | Heat, fruit load, and drying |
| Dwarf eggplant | 1 | 15–18 L (4.0–4.8 US gal; 3.3–4.0 imp gal) | Support and a long warm season |
| Bush beans | Several, at packet spacing | 10–15 L (2.6–4.0 US gal; 2.2–3.3 imp gal) | Spacing and picking frequency |
| Herbs or salad greens | Several, according to mature spacing | 5–10 L (1.3–2.6 US gal; 1.1–2.2 imp gal) | Heat, succession sowing, and moisture |
| Short carrots or radishes | Thin to packet spacing | 10–15 L (2.6–4.0 US gal; 2.2–3.3 imp gal) | Root depth and thinning |
One compact tomato is a sensible upper limit for this shape of container. An indeterminate tomato keeps extending its canopy and fruiting stems, so its support becomes taller and its demand for water rises. A single bucket can become unstable before the roots have literally filled every bit of mix. Sprawling squash has a similar square-footage problem, while several fruiting plants divide the moisture and nutrient reserve too aggressively.
My judgment is to use leafy greens in a bucket only where you can move them out of reflected afternoon heat. A dark bucket against warm masonry is a poor greens site; I’d give that position to a pepper and keep lettuce or coriander on the cooler, brighter edge. Use How to water vegetables in containers during a heatwave before a hot spell, because a small root volume can move from adequately moist to dry faster than a garden bed.
A 20–30-litre container (5.3–7.9 US gallons; 4.4–6.6 imperial gallons) gives a larger moisture and nutrient buffer than the bucket, though it also weighs more and takes more floor area. For a tomato that you cannot check regularly, the bigger pot is usually the better trade. For herbs, radishes, or a compact pepper, the bucket saves space without asking the plant to carry an oversized canopy.
For a crop-by-crop shortlist, see Best vegetables for a 5-gallon (19-litre) container. Choose the crop after checking the site’s sun, wind, and watering access, not just after finding an empty bucket.
When the label is missing, make the conservative call
A missing label is not a puzzle you need to solve with smell, colour, or a vigorous scrub. Use a three-way decision: keep, ask, or reject.
Keep the bucket when it is new or has a known food-use history, carries an explicit food-contact or food-use statement, has a traceable product identity, and is intact. Drill the holes only after it passes those checks.
Ask when the bucket looks promising but the wording is incomplete. Give the manufacturer the product number and ask whether the exact model is intended for food contact, what conditions apply, and whether the statement covers repeated use. A shop employee’s guess is not a substitute for that confirmation.
Reject an unmarked bucket with unknown history, a bucket labelled non-food, one that held chemicals, or one that is brittle, stained, cracked, or strongly odorous. Use it for ornamentals or non-food storage if that use is appropriate, or follow local disposal advice.
Use this decision path at the shelf before putting a bucket in your trolley.
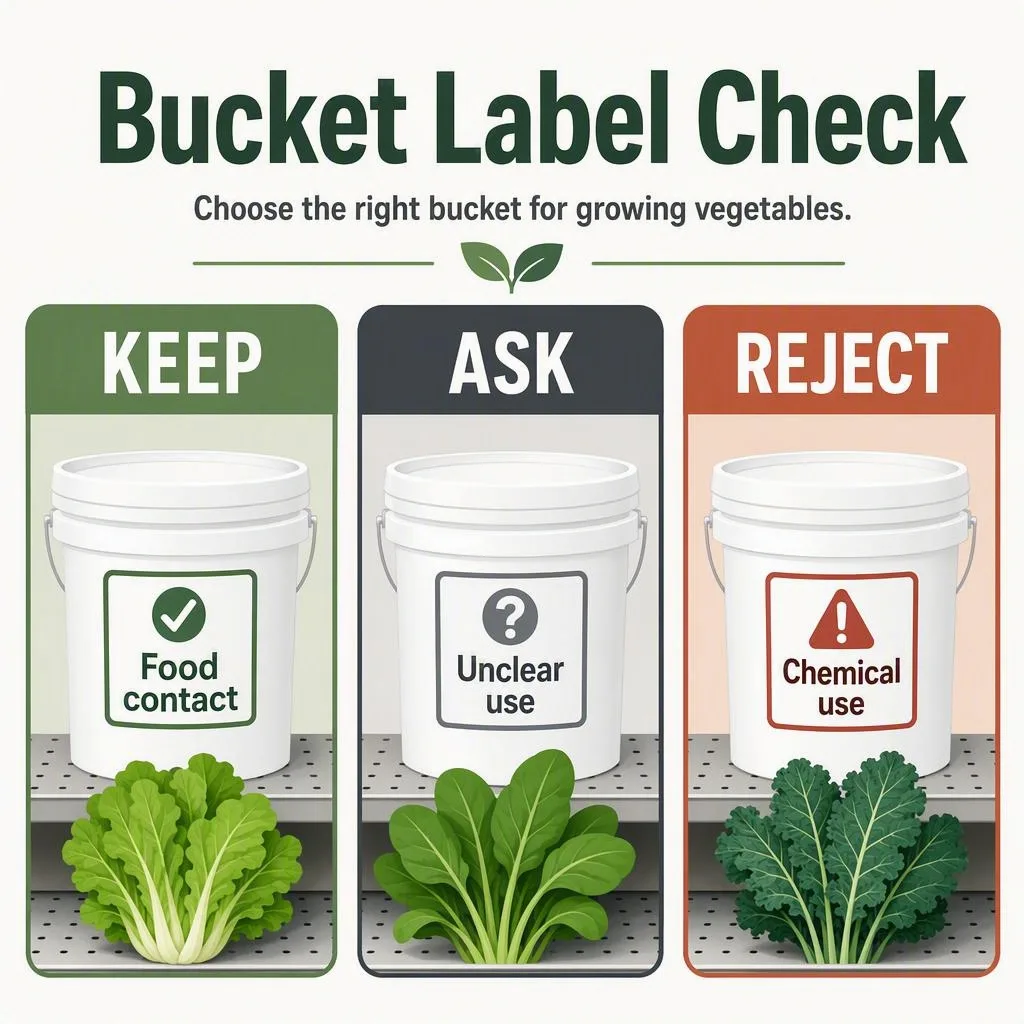
- Does the bucket have explicit food-contact or food-use support? If yes, continue. If no, ask the manufacturer; if nobody can confirm it, reject it for vegetables.
- Do you know the previous contents? If they were food ingredients or clean water, continue checking. If they were chemicals or the history is unknown, reject it for edible plants.
- Is the bucket intact, cleanable, and free from chemical staining or a strong smell? If yes, prepare it. If no, reject it.
If a crop is already planted in an unverifiable bucket, there’s no need for a dramatic response. Move the plant into a verified container when practical, keeping as much of its root mix together as you can. A liner or cleaner cannot turn an unknown material history into a known one.
Before the weekend, photograph the side and base of every bucket you’re considering, check the product number against the manufacturer’s information, and make the keep, ask, or reject decision. Only then drill the holes and buy the potting mix.